
Hello Made From Pinterest readers! I’m thrilled to be back here sharing with you what I made from Pinterest this past week …
drum roll please …
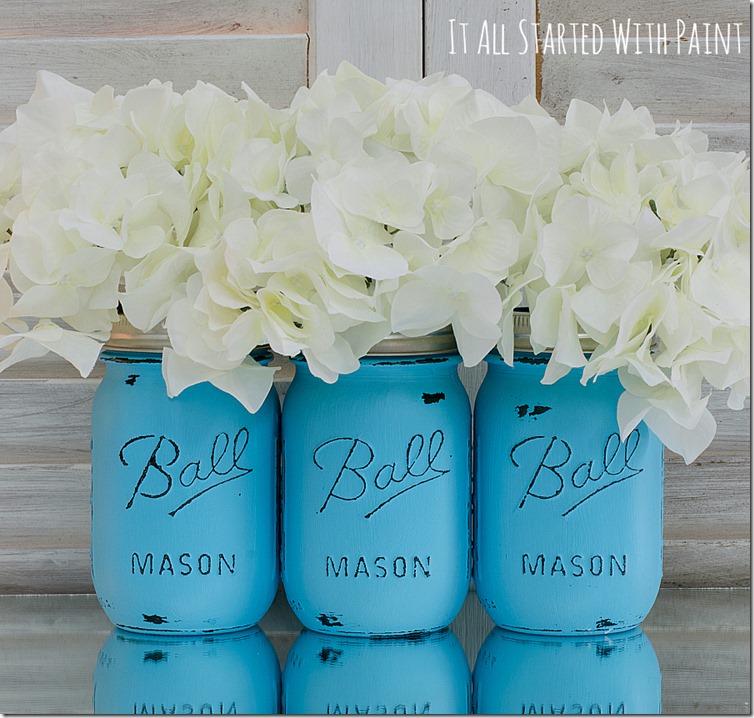
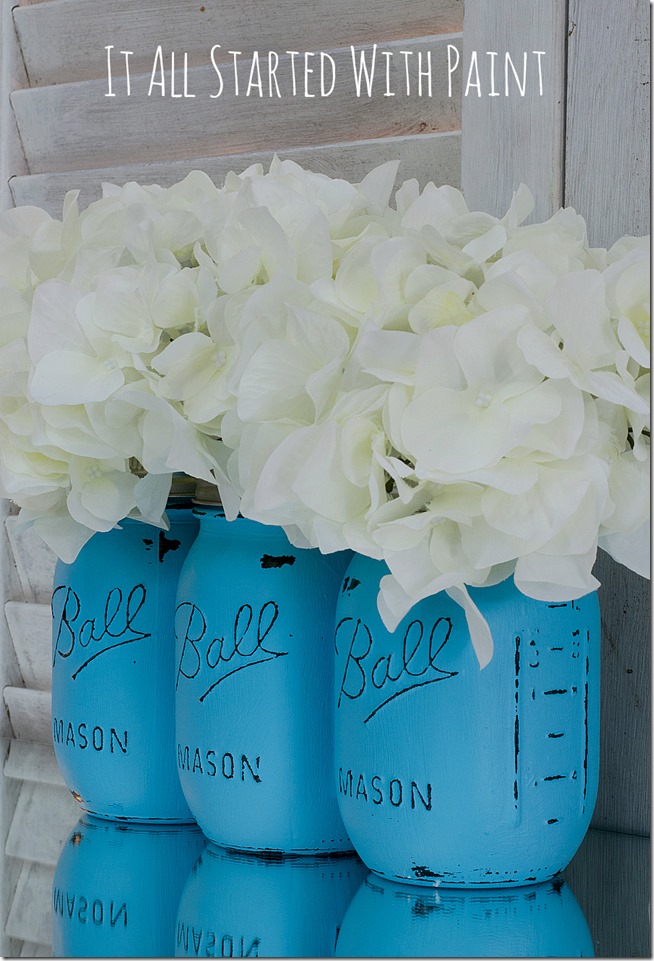
painted and distressed mason jars!
And now I must bow my head in shame. You see, my inspiration pin is mine. As in my very own project that I shared last Spring here …
Are you following my shamefulness? Or is it shamelessness? Either way it’s most certainly shameful for me to find inspiration from myself!
*Sigh*
Now, granted, that original project – a project that’s been pinned more than 89,000 times – wasn’t a tutorial. It was more of a question mark. Asking my readers if they would purchase painted and distressed mason jars if I stocked them at my Etsy shop.
But this project? This project is a true tutorial with step-by-step instructions on how to make painted and distressed mason jars …
Step 1: Clean Your Jars
Seriously. Wash them with soap and hot water. Dry completely. And if they’re still greasy, wipe them down with rubbing alcohol. And wash and dry them again.
Step 2: Paint (2 Coats)

I gave my jars two coats of turquoise acrylic paint that I found at the craft store. Make sure it’s not gloss. Or satin finish. Or enamel. They don’t work as well. They show brush strokes and don’t distress as easily.
Step 3: Patience
Let your jars dry overnight. I mean this. Otherwise when you start to distress you’ll find yourself peeling off strips of paint. The paint needs to cure. Overnight.
Step 4: Distress

I use a little square of sandpaper and sand along the top lid threading edges, all the raised type on the fronts, sides, and backs of the jars. And then I add a few more distressed areas for good measure.
Step 5: Seal

I use a matte spray enamel sealer that I found at the craft store. You could use a gloss if you wanted a shinier finish. I find the matte is much more forgiving of brush strokes. And I prefer that chalkier look. But that’s just me …
Step 6: Add Flowers …

… and enjoy!
And now here comes the second time in a single post that I must bow my head in shame. Again. As I hit you with my shameless Etsy shop plug. You see, if you’d rather not spend the time making and painting and distressing your own mason jars, I’m more than happy to make them for you. Just visit my Etsy shop here …
And I just added a listing for those turquoise painted and distressed jars here …
![]()

***You can also find me at It All Started With Paint and Mason Jar Crafts Love and follow me on Pinterest, Facebook, Twitter, and Google+ ***
Thanks so much Linda! It’s always great to see the projects that are going on at your place!
If you don’t seal them what will happen?
Sealer helps to make the paint permanent, no yellowing, flaking, and weatherproof. It just makes a more finished permanent project. Hope yours turn out great!
They look great. I see your paint is American. I live in Australia. Do u suggest all paint from here? Thank u in advance ?
An acrylic paint of any brand will work. Isn’t this a fun project?
Why is it that when I try to paint the second coat, the paint peels off? It doesn’t happen on all jars and I am using the matte finish acrylic paints. I let the first coat dry overnight. It’s very puzzling to me…Help.
Hi JoAnn! We have contacted the original guest contributor regarding your questions and here is what she has to say:
“Hmmm … I’m puzzled too.
I guess make sure she’s using a bristle brush and not a foam sponge. Also, she should make sure the jars are thoroughly cleaned – especially if she’s using older jars. Hot soapy water and then dry completely. Also, try not to handle the jars too much because the oils from our skin gets on the glass and sometimes the paint doesn’t adhere.”
Hope that helps! Deb
What grit sand paper do you recommend?
I would use something light, like between 360-600. It doesn’t take much. Thanks Yvette!
Up close, can you see your brush marks? I used the exact same paint (brand AND color) and after 2 coats I can still see them, but just up close, so it’s not awful. I still love them though. I painted 3 turquoise, 2 white and 2 gray, am going to plant flowers in them, and attach to a pallet for out on our patio. I’m combining a couple different Pinterest ideas.
Hi Kris! I will try and ask the original author of this post but I’m guessing that you will probably see some brush marks. What a cute idea to plant flowers and attach to a pallet. Wish I could see it!
Kris – original author here! Yes, up close you can still see brush marks. If it bothers you, you can give them another coat of paint. They don’t bother me (or any of my customers, though). That’s the beauty of the distressing part. It underscores that these are meant to be imperfect – and celebrated as such! And once you add water for flowers (or soil for your plants) they won’t be as noticeable. The other way to eliminate brush marks is to use spray paint on the jars instead. You just need to be careful to let them dry completely (and for a few days) between coats. I find that multiple layers of spray paint can result in some bubbling.
Hope that helps! 🙂 Linda
Do you have any experience with different colors not covering? I used the same paint in a light blue and a dark green, the light blue covered nicely in 2 coats but the same paint in green was still translucent after 4 coats! any ideas?
Wow. I can’t think of why green was a problem. I know that sometimes red and believe it or not black can be tricky. Was is the same brand of paint? Weird!
Ann, the original author of the post has this answer for you:
The difference is in the type of acrylic paint used. You need to use the matte finish versions. The enamels and satins or glosses won’t work the same way. That’s why you can’t get the coverage you want. You need to use a matte finish (which isn’t always identified, but just avoid enamel or gloss or satin finish and you should be okay).
Hope that helps! Deb
I have made distressed jars but put 1-2 coats of flat black spray paint before the acrylic paint and they turned out awesome. But now I’m attempting to make halloween jars and don’t want to use spray paint. I paint the jars with the color and have let it set for 24-48hrs and when I paint the second coat the first coat peels off. The only way I have been able to paint the second coat is to spray 1-2 coats of a clear coat but would like other suggestions.
Thank you
Celeste, here is a great tutorial on how to make these distressed jars from the original creator of the post. Hope it helps! https://masonjarcraftslove.com/painted-mason-jars-pink-ombre/
These look amazing – thanks for the tutorial. Do you know if these could then be used for poured candles? Thanks!
Hi Tonya!
I have never filled them with candles but I am going to guess that they will be just fine. I’d love to hear how they turn out! Deb
can i wash jars aftrr sealing
Hi Christine! I would not put them in the dishwasher. I’m thinking you could wipe them with a lightly damp cloth without ruining them. I have just dusted mine so I’m hoping that would work for you!